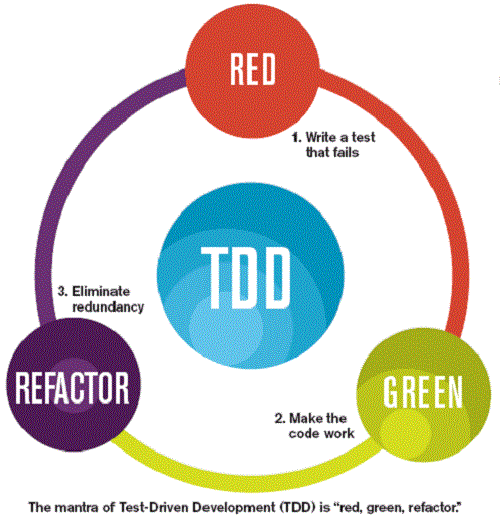
This post goes to all those devs that have heard about TDD methodology but have not tried it yet. We will follow the RED – GREEN – REFACTOR cycle to build a really small API to save users to a database that will help you get started with this methodology. If you don’t know what TDD is about, I reccommend the following articles:
- In English: https://medium.com/javascript-scene/testing-software-what-is-tdd-459b2145405c
- In Spanish: https://medium.com/nursoft/implementar-tdd-facilmente-4d2cffaa9172
If you get lost during the process, you can find the source code for this API in https://github.com/gregodadone/tdd-example-api
I strongly suggest you do not copy-paste my code, and write it by yourself, so you see how the IDE behaves as errors come up and feel the whole experience of doing TDD. Let’s start!
Project Requeriments
This project consists in creating a non-secured API to create users with username, display name, and password and store them in a database with the password encrypted.
Creating The Project.
The first thing we will do is go to Spring Initializr and create a project. By the time I’m writing this article I’m using the following options
Main Options
- Maven Project
- Java
- Spring Boot 2.3
Dependencies
- Spring Web
- Spring Data JPA
- Spring Security
- Lombok
- H2 Database
Project Metadata
- Group: com.tdd
- Artifact: example-api
- Name: tdd-example-api
- Description: Example API
- Package Name: com.tdd.example-api
- Packaging: Jar
- Java: 11
Implementing the Tests
So, now that we have our project loaded into our IDE, we create our Test class in src/test/java/com/tdd/exampleapi. We will call it UserControllerTest
As this will be an Integration Test, we should annotate this class with @SpringBootTest
Then we should write our first test. The format I will use for names is actionDone_conditionForPassing_expectedResult. Having said this, let’s write a test called postUser_whenUserIsValid_receiveOkResponse.
@SpringBootTest
public class UserControllerTest {
    @Test
    public void postUser_whenUserIsValid_receiveOk() {}
}
Ok, now we should fill our test. The first thing we need to post an user is an User, so we should create one with username, display name, and password as specified in the requeriments.
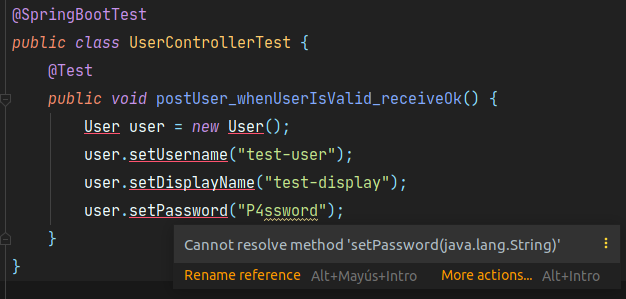
So, we have an user with our attributes set, but since we don’t have an User class yet, we see compilation errors in our IDE. In Java, as it is a compiled and static typed language, compilation errors are the first RED in the TDD cycle. As we should add small portions of code that would translate to a single function each time in the test, we should now make these compilation errors dissappear, and we do so by creating a new class called User in the main project package src/main/java/com/tdd/exampleapi
package com.tdd.exampleapi;

public class User {
    private String username;
    private String displayName;
    private String password;

    public String getUsername() {
        return username;
    }

    public void setUsername(String username) {
        this.username = username;
    }

    public String getDisplayName() {
        return displayName;
    }

    public void setDisplayName(String displayName) {
        this.displayName = displayName;
    }

    public String getPassword() {
        return password;
    }

    public void setPassword(String password) {
        this.password = password;
    }
}
Now that we have our User, let’s go back to the UserControllerTest and run the test…

It’s passing! We have successfully reached the GREEN stage in the TDD cycle. This test may not make much sense now but you are starting to understand what TDD feels like!
So, why don’t we go ahead and reach the REFACTOR stage. We can do it with our User class, that right now looks a little cluttered with all those getters and setters. Since we have lombok in our dependencies, why don’t we replace them with an annotation like @Data?
@Data
public class User {
    private String username;
    private String displayName;
    private String password;
}
Ah! Now it looks a lot better! If we run the test again we see it’s still passing, so we have successfully completed the REFACTOR stage! Now the cycle will start over again with another RED.
So the next thing we need to actually post an user, is an endpoint where to post it and a method to actually post it. In Spring we have a class called TestRestTemplate loaded as a bean in every application, so we will use this to post our user to an endpoint. Lets set the url for our endpoint as «/api/1.0/users». It’s a good practice to specify in the URL the version of the API for if we have to deal with more than one version some day in the future.
So, let’s inject the TestRestTemplate bean, and save the answer of it’s postForEntity method in a variable.
@SpringBootTest
public class UserControllerTest {

    @Autowired
    private TestRestTemplate testRestTemplate;

    @Test
    public void postUser_whenUserIsValid_receiveOk() {
        User user = new User();
        user.setUsername("test-user");
        user.setDisplayName("test-display");
        user.setPassword("P4ssword");

        ResponseEntity<Object> response = testRestTemplate.postForEntity("/api/1.0/users", user, Object.class);
        // We are using Object as ResponseEntity since we do not care about the class type for this example
    }
}
Now we have no compilation errors, but if we run the test it’s not passing, we are in the RED stage. This is because we have no Controller for our endpoint, so let’s create UserController in the main package, let’s mark it with @RestController and create a @PostMapping createUser method for our endpoint.
@RestController
public class UserController {

    @PostMapping("/api/1.0/users")
    public void createUser() {}
}
Let’s run the test again… It’s still not passing! And we are getting a NoSuchBeanDefinitionException for TestRestTemplate! This is because TestRestTemplate is only auto-configured when we have specified a webEnvironment into our @SpringBootTest annotation, so let’s add a web environment in a random port.
@SpringBootTest(webEnvironment = SpringBootTest.WebEnvironment.RANDOM_PORT)
public class UserControllerTest {
Now the test is passing! We have are again the GREEN stage, so we can now refactor. This time, the only thing we can improve is extract the URL in the test into a constant since we will use it multiple times.
private static final String API_1_0_USERS = "/api/1.0/users";
To finally complete our test now we need to assert that the response is an OK 200 HTTP status. So we will use assertThat method from assertJ library.
@Test
public void postUser_whenUserIsValid_receiveOk() {
    User user = new User();
    user.setUsername("test-user");
    user.setDisplayName("test-display");
    user.setPassword("P4ssword");

    ResponseEntity<Object> response = testRestTemplate.postForEntity(API_1_0_USERS, user, Object.class);
    assertThat(response.getStatusCode()).isEqualTo(HttpStatus.OK);
}
Let’s run the test… Something’s not good! We are receiving a 401 response instead of a 201! This is because we are using Spring Security, which enables SecurityAutoConfiguration class with some default authentication values. You can read more about this subject here https://www.baeldung.com/spring-boot-security-autoconfiguration, since we don’t need authentication for this example we will disable this configuration in our application. Let’s go to TddExampleApiApplication class and add an exclude parameter to @SpringBootApplication
@SpringBootApplication(exclude = SecurityAutoConfiguration.class)
public class TddExampleApiApplication {
Let’s go back to our test again and… Now it’s passing! We have completed a total of 3 TDD cycles so far! And this test is finished!
Now that you don’t need that many details, we will start speeding up things a little.
Let’s create a second test, that assures user is being saved into the DB. Since the user creation we did in the previous test needs to be repeated here, let’s also extract that into a method.
@Test
public void postUser_whenUserIsValid_saveUserToDB() {
    User user = createUser();
    testRestTemplate.postForEntity(API_1_0_USERS, user, Object.class);
    assertThat(userRepository.count()).isEqualTo(1);
}

private User createUser() {
    User user = new User();
    user.setUsername("test-user");
    user.setDisplayName("test-display");
    user.setPassword("P4ssword");
    return user;
}
You may find strange if you were too familiar with IDE suggestions, to not be suggested. And yes, this is part of TDD, knowing the method’s name you are going to use. Sometimes you may just put placeholders if you don’t know the exact name, anyway it would not work until implemented, and once you have created the logic against the test, you can replace the placeholder with the actual name. In this case for UserRepository you know you need to count the users in the table, but you may not know what method is the correct one for that. Just don’t worry too much. The important thing is to follow the pattern.
Again compilation errors… So let’s create the User Repository, this will be an interface that will use Spring Data JPA to have count and other methods available. We should extend from JpaRepository with the entities class and entities ids class as parameters.
@Repository
public interface UserRepository extends JpaRepository<User, Long> {
}
Now we have errors when running all of the test. And ofcourse, we have not marked the User as a DB entity, neither have specified an @Id attribute, so let’s do it.
@Data
@Entity
public class User {

    @Id
    @GeneratedValue
    private long id;

    private String username;
    private String displayName;
    private String password;
}
We still have an error in our second test, and ofcourse, we have not implemented the logic to save our user. We will need a Business Logic layer so we need a Service class. Let’s create it. We will need to inject UserRepository into it.
@Service
public class UserService {

    private final UserRepository userRepository;

    public UserService(UserRepository userRepository) {
        this.userRepository = userRepository;
    }

    public void saveUser(User user) {
        userRepository.save(user);
    }
}
And now we need to use this new service in the controller. So let’s inject it there. Also, we need to to receive the user we want to save in the request now, so we should add a @RequestBody to the createUser method.
@RestController
public class UserController {

    private final UserService userService;

    public UserController(UserService userService) {
        this.userService = userService;
    }

    @PostMapping("/api/1.0/users")
    public void createUser(@RequestBody User user) {
        userService.saveUser(user);
    }
}
Now let’s run the test again… It’s failing! We continue on the RED stage! But this time is because we are expecting 1 user to be on the DB and instead we have 2. This is because the first test is also inserting an user. To make sure tests do not affect each other, let’s apply another good practice, and let’s clean the environment before each test. In JUnit5 we do this with a @BeforeEach annotated method. This should go below class attributes and above tests.
@BeforeEach
public void clear() {
    userRepository.deleteAll();
}
Now all the tests are passing! Another successful TDD cycle. This time our code looks fine so we don’t need any refactor.
We are missing only one requeriment now, and it is we need to make sure the password in the DB is not being saved in plain text, but encrypted. So let’s create a test for that. We know there is only going to be one user in the DB, and we know even the user we create and the user we retrieve from the DB are the «same», if password is encrypted that field should differ between them.
@Test
public void postUser_whenUserIsValid_passwordIsEncryptedInDB() {
    User user = createUser();
    testRestTemplate.postForEntity(API_1_0_USERS, user, Object.class);

    User savedUser = userRepository.findAll().get(0);
    assertThat(user.getPassword()).isNotEqualTo(savedUser.getPassword());
}
This test should accomplish our requeriment, but if we run it now, we see it’s failing, passwords are the same. So let’s encrypt that password. In order to do that, let’s modify our Service and add a PasswordEncrypter. Let’s declare it as an interface and initialize it as a BCryptPasswordEncoder in the constructor. Finally, let’s encode the password before saving it to the DB.
@Service
public class UserService {

    private final UserRepository userRepository;
    private final PasswordEncoder encoder;

    public UserService(UserRepository userRepository) {
        this.userRepository = userRepository;
        this.encoder = new BCryptPasswordEncoder();
    }

    public void saveUser(User user) {
        user.setPassword(encoder.encode(user.getPassword()));
        userRepository.save(user);
    }
}
We run the test again and… voila! It’s passing! Password is now encrypted, you can debug if you want to see the encrypted value. No refactor needed for this cycle also.
We have successfully completed all our requeriments following the TDD methodology, and this API looks great, and now you are also ready to TDD your own projects.